Table of Contents
Remote Access
Remote access to the NIMBioS computing facilities is an important feature for both the collaborating researchers of workgroups and workshops as well as to faculty and staff.
Required Reading
Concepts and Terminology
The idea of accessing computing services remotely seems easy enough until you try to describe it to someone who's never heard the terms before, and then things can get very confusing very quickly. For this reason, this section will address important concepts and define required terms.
Terminology
Local Host: The machine you are physically sitting in front of.
Remote Host: The remote machine you are attempting to use from your local host. In the instructions below, whenever you see the term <Remote Host>, substitute the name of a NIMBioS computer. This will typically be something like home.nimbios.org or equus.nimbios.org unless you have a specific alternative host name in mind.
Local File / Local Directory: The file or directory on the machine you are physically sitting in front of. In the instructions below, whenever you see the term <Local File> or <Local Directory>, substitute the name of the file or directory on your machine that you want to work with.
Remote File / Remote Directory: The file or directory on the remote host. In the instructions below, whenever you see the term <Remote File> or <Remote Directory>, substitute the name of the file or directory on your machine that you want to work with.
Username: Your NIMBioS account user name. In the instructions below, whenever you see the term <Username>, substitute the username for your NIMBioS user account.
Password: Your NIMBioS account password. In the instructions below, whenever you see the term <Password>, substitute the password for your NIMBioS user account.
Concepts
Terminal Access: Terminal access is text-only, command-line-driven access to the NIMBioS computing services. This type of access is the oldest form of remote access service and has been around since the 70's. Despite being a service that's over 40 years old, and it's lack of a graphical user interfaces, terminal access is still the most powerful way to get things done. Because of it's sheer power (<insert 'Muwa-ha-ha' here>) remote terminal access is critical to the NIMBioS IT staff for administrative reasons.
In years gone by terminal access was granted via services like telnet and rsh. However, these services were inherently insecure. They did not encrypt the username and password transmitted as the user logged in, and they did not encrypt the user's traffic as it was transmitted across the network. For these reasons NIMBioS has disabled both telnet and rsh, and retired them in favor of SSH, which is vastly more secure.
X11: X11 is a client/server graphical user interface protocol invented at MIT in 1983. If you sit down at the console of any NIMBioS workstation, everything you see on the screen is presented to you by an X11 server that is rendering the graphics on your screen on behalf of an X11-enabled program that may be running on any computer, anywhere else in the world. A user does not need access to the remote host's console in order to run an X11 program, and in fact the console user on the remote host need not even know that another user is logged in remotely. For this reason X11 is very powerful. When in use, the X11 protocol is tunneled through SSH, providing strong encryption to protect a user's actions and data from prying eyes.
VNC: Virtual Network Computing is a graphical desktop sharing system that allows a user to control the desktop of a computer remotely. The user (on his/her local host) will use a VNC client to control the desktop of a remote host. The VNC service is probably what you typically think of when you think about remote access, where someone standing in front of the remote host's console will see the mouse move, windows open, and text typed to the screen with unseen hands, as though by magic. Unfortunately, while useful, this approach to remote access is not as powerful, flexible, or as secure as SSH+X11. A VNC service assumes control over the console, which means that no one else can use that computer's console. This is something of a waste of computer resources compared to X11, but here at NIMBioS this is only an obstacle for visitors or students who do not have their own NIMBioS workstation on a desk of their own. There are also several security concerns about VNC services, as VNC servers tend to use a completely separate authentication mechanism that does not integrate with the rest of the computer system. For this reason the VNC service at NIMBioS is carefully controlled to prevent abuse or compromise.
SSH Terminal Access
Basic terminal access to NIMBioS computing resources can be had via SSH, or [S]ecure [SH]ell. SSH is very robust, stable, and secure, and it is trusted with nearly every security-related aspect of NIMBioS' IT administrative needs.
NOTE: By default most SSH clients will close the connection automatically after a set number of minutes of inactivity. If this poses a problem for your work (i.e. if you like to step away from the console for, say, a lunch break, and expect to come back and pick up where you left off) then you should enable the “KeepAlive” option for your SSH client. See the instruction manual for your SSH client for details.
Windows
For Windows users, you will need to download and install an SSH program. There are several free SSH clients available. The examples below use PuTTY, which is freely available here http://putty.org
- Click:
Start>All Programs>PuTTY>PuTTY - Navigate to:
Category>Session - Host Name (or IP Address): <Remote Host>
Ex:home.nimbios.org - Click: Open
- If a window appears entitled, “PuTTY Security Alert”, and reads, “The server's host key is not cached in the registry…”, click:
Yes - login as: <Username>
- password: <Password>
OSX
For OSX users, the ssh command comes with your operating system.
- Open a terminal window
- Type:
ssh -l<Your NIMBioS User Name>
Ex:ssh -l johndoe3 home.nimbios.org - If you see, “
The authenticity of host '<hostname>' (<IP address>) can't be established.”, type:yes - Enter your password
Linux
For Linux users, the ssh command comes with your operating system.
- Open a terminal window
- Type:
ssh -l<Your NIMBioS User Name>
Ex:ssh -l johndoe3 home.nimbios.org - If you see, “
The authenticity of host '<hostname>' (<IP address>) can't be established.”, type:yes - Enter your password
SSH File Access
Terminal access to a remote computer is often of little use without the ability to transfer files back and forth. File transfers are handled by SFTP. SFTP allows FTP-like file transfer capability with the safety and security of SSH.
Windows
For Windows users, you will need to download and install an SSH program. There are several free SSH clients available. The examples below use Filezilla, which is freely available here.
- Click:
Start>All Programs>FileZilla FTP Client>FileZilla - Host: <Host name of a NIMBioS computer>
Ex:home.nimbios.org - Username: <Your NIMBioS User Name>
- Pasword: <Your NIMBioS Password>
- Port: 22
- Click:
Quickconnect
You can now drag and drop files back and forth between the file viewer pane showing the file contents of your local host, and the pane showing the file contents of the remote host.
OSX
- Open a Terminal window
- To download a remote file from a remote host to your local host:
Type:scp<Username>@<Remote Host>:<Remote File>./
Ex:scp johndoe3@home.nimbios.org:~/Desktop/report.pdf ./
The remote file will be downloaded to your local host and placed in your current working directory. - To download a remote directory (and all the files and subdirectories therein) from a remote host to your local host:
Type:scp -r<Username>@<Remote Host>:<Remote Directory>./
Ex:scp -r johndoe3@home.nimbios.org:~/Desktop/reports-dir ./
The remote directory will be downloaded to your local host and placed in your current working directory. - To upload a file from your local host to a remote host:
Type:scp<file>@<Remote Host>:<Remote Directory>
Ex:scp report.pdf johndoe3@home.nimbios.org:~/Desktop/ - If you see, “
The authenticity of host '<hostname>' (<IP address>) can't be established.”, type:yes - Enter your password
OSX users can obtain GUI-based SFTP programs as well. One such example is CyberDuck, which is freely available here: http://cyberduck.ch
Linux
- Open a Terminal window
- To download a remote file from a remote host to your local host:
Type:scp<Username>@<Remote Host>:<Remote File>./
Ex:scp johndoe3@home.nimbios.org:~/Desktop/report.pdf ./
The remote file will be downloaded to your local host and placed in your current working directory. - To download a remote directory (and all the files and subdirectories therein) from a remote host to your local host:
Type:scp -r<Username>@<Remote Host>:<Remote Directory>./
Ex:scp -r johndoe3@home.nimbios.org:~/Desktop/reports-dir ./
The remote directory will be downloaded to your local host and placed in your current working directory. - To upload a file from your local host to a remote host:
Type:scp<file>@<Remote Host>:<Remote Directory>
Ex:scp report.pdf johndoe3@home.nimbios.org:~/Desktop/ - If you see, “
The authenticity of host '<hostname>' (<IP address>) can't be established.”, type:yes - Enter your password
Linux users can often find GUI-based SFTP file management built into your file manager. (Typically this is Nautilus for Gnome desktop users, and Konqueror for KDE users.) Please see the online documentation for your particular file manager. NIMBioS users, please see The Linux File Manager: Nautilus, the section entitled, “Connecting to Remote Machines”.
SSH+X11 - Using GUI Programs
X11 was designed and written at a time when computer power was still very expensive by today's standards. At the time, the cost-effective thing to do was to place low-cost, low-power dumb terminals on each user's desk and connect those terminals to a high-power (and high-cost) server that sat in the basement. The dumb terminal had no computational power of it's own, all it did was interpret the X11 protocol being fed to it by the server and render the graphical user interface for the user. X11 was designed to allow programs to be run remotely and viewed locally.
NOTE: Graphically-intensive programs will likely be slow. Today's programs tend to be more graphical than the programs of yesteryear, and on slow network connections you may feel the pinch. There are options to enable data compression that may help, see the instruction manual for your SSH client for details.
Windows
For Windows users:
- You will need to download and install an SSH program. There are several free SSH clients available. The examples below use PuTTY, which is freely available here.
- You will also need an X11 server program. There are several free X11 servers available, and you can find a list of them here: http://www.google.com/search?aq=f&sourceid=chrome&ie=UTF-8&q=free+windows+x11. The examples below use Xming, which is freely available here: http://sourceforge.net/projects/xming/files/Xming/.
- Click:
Start>All Programs>Xming>Xming
NOTE: If you have a firewall, make sure to configure your firewall so that it will not block network traffic for Xming. - Click:
Start>All Programs>PuTTY>PuTTY - Navigate to:
Category>Connection>SSH>X11 - Turn on:
Enable X11 Forwarding - Navigate to:
Category>Session - Host Name (or IP Address): <Remote Host>
Ex:home.nimbios.org - Click: Open
- If a window appears entitled, “PuTTY Security Alert”, and reads, “The server's host key is not cached in the registry…”, click:
Yes - login as: <Username>
- password: <Password>
Now, if you run any graphical program on the remote host, you should see a window appear on your screen.
")
OSX
For OSX users, the ssh command comes with your operating system.
- Open a terminal window
- Type:
ssh -X -l<Your NIMBioS User Name>
Ex:ssh -l johndoe3 home.nimbios.org - If you see, “
The authenticity of host '<hostname>' (<IP address>) can't be established.”, type:yes - Enter your password
The addition of the -X command line option tells the SSH client to turn on X11 forwarding.
Linux
For Linux users, the ssh command comes with your operating system.
- Open a terminal window
- Type:
ssh -X -l<Your NIMBioS User Name>
Ex:ssh -l johndoe3 home.nimbios.org - If you see, “
The authenticity of host '<hostname>' (<IP address>) can't be established.”, type:yes - Enter your password
The addition of the -X command line option tells the SSH client to turn on X11 forwarding.
UT Campus VPN
A Virtual Private Network (VPN) is a method of forwarding your network connection through another host. A VPN allows users to privately share information between remote locations, or between a remote location and a university (or business) network. A VPN can provide secure information transport by authenticating users and encrypting data to prevent unauthorized persons from reading the information transmitted. The VPN can be used to send any kind of network traffic securely.
The University of Tennessee hosts a VPN service that is available for everyone who has a UT-assigned NetID.
Link: UT VPN
The only drawback is that use of a VPN may mean that all traffic is forwarded, which may not be desirable. If this is the case for your situation then SSH tunnelling may be your best solution.
SSH Tunnelling
SSH tunnelling is a method through which you forward a connection from your machine through another host. But unlike a VPN service, you only forward the traffic for the program(s) that you specify. (Namely, for our purposes, your web browser.) All other traffic coming or going from your machine is unaffected. There are many occasions in which it is useful to access resources and services on the UT university network remotely. But sometimes a firewall prevents you from being able to reach your destination.
Q: Why would I want to do that?
A: A case in point:
You are affiliated with the UT campus and have a UT-assigned NetID. You want to access the UT library to retrieve a paper, but you are off-campus and the library won't allow you access. (While UT offers a VPN service, you don't want to connect to a VPN service just because you want to retrieve a single paper. Maybe you have other network-based processes running on your machine, and you don't want to interrupt them by connecting to a VPN.) How do you access the library?
One way to do this is to use one of the NIMBioS machines as a proxy, whereby you forward network traffic from your web browser through a NIMBioS machine. It's sort of like setting up a detour on the information super highway. Here are the steps involved:
- Set up an SSH tunnel between you and a NIMBioS machine
- Configure your web browser to use that tunnel as a proxy service
- When you're done, close the SSH tunnel and turn off your browser's proxy service
The only drawback is that your program must be designed to be able to use a SOCKS proxy service, and you will need to familiarize yourself with that program's documentation so that you may successfully configure and use it. If your program does not allow for the use of a proxy, then using a VPN may be your best solution.
SSH Tunnelling Setup
The first step is to set up an SSH tunnel proxy service between you and a NIMBioS machine.
Linux and OSX
In a terminal window, type: ssh -D 8080 <your-username>@equus.nimbios.org
You may be prompted to enter the password for your NIMBioS account.
Windows
- Click:
Start>All Programs>PuTTY>PuTTY - Navigate to:
Category>Session - Host Name (or IP Address): <Remote Host>
Ex:home.nimbios.org - Click:
Category>SSH>Tunnels - Under “Add new forwarded port:”
- Destination:
localhost:8080 - Click:
Add
- Click: Open
- If a window appears entitled, “PuTTY Security Alert”, and reads, “The server's host key is not cached in the registry…”, click:
Yes - login as: <Username>
- password: <Password>
Browser Setup
The next thing to do is to configure your browser to use localhost:8080 as a SOCKS or SOCKSv4 proxy. Specific details for this step is outside the scope of this document. There are multiple browsers, available in multiple versions each with their own configuration settings user interface, and untold multitudes of related browser plugins. It would simply be too difficult to list them all here. However, the following links should help get you going int the right direction.
-
- Plugin: Proxy Switchy!
-
- Plugin: FoxyProxy
If you have difficulty, see a NIMBioS IT staff member for assistance.
Remote Desktop Access
A VNC server is used to provide remote access to the console of NIMBioS workstations. Because the VNC server does not integrate into the rest of the NIMBioS authorization scheme the use of a VNC service provides some unique challenges to network security. For this reason an SSH session will be required to start and stop the service.
Step 1: Download And Install A VNC Client
In order to use the VNC service you will need a VNC client. There are free VNC clients available for all major operating systems. For example purposes a particular set of VNC clients have been chosen to present to you here, but you can use a different client if you choose.
NOTE: You are responsible for reading the instructions for your VNC client thoroughly, and familiarizing yourself with all of it's controls and functions.
Windows
For Windows users:
- You will need to download and install an SSH program. There are several free SSH clients available. The examples below use PuTTY, which is freely available here.
- You will also need a VNC client program. There are several free X11 servers available, and you can find a list of them here: http://www.google.com/search?aq=f&sourceid=chrome&ie=UTF-8&q=free+windows+vnc+client. The examples below use Tight VNC, which is freely available here: http://www.tightvnc.com/download.php.
NOTE: You will only need a VNC client, not a VNC server.
OSX
For OSX users: You will need to download and install a VNC client program. There are several free VNC clients available, and you can find a list of them here: http://www.google.com/search?aq=f&sourceid=chrome&ie=UTF-8&q=free+osx+vnc+client. The examples below use Chicken Of The VNC, which is freely available here: http://sourceforge.net/projects/cotvnc/.
Linux
For Linux users: You will need to download and install a VNC client program. There are several free VNC client available, and you can find a list of them here: http://www.google.com/search?aq=f&sourceid=chrome&ie=UTF-8&q=free+linux+vnc+client. If you are using a particular Linux distribution then all of these programs are likely already available from your distribution's software repository. The examples below use Vinagre, which is freely available here: http://projects.gnome.org/vinagre/.
Step 1: Logging In via SSH
Windows
- Click:
Start>All Programs>PuTTY>PuTTY - Navigate to:
Category>Session - Host Name (or IP Address): <Remote Host>
Ex:home.nimbios.org - Click: Open
- If a window appears entitled, “PuTTY Security Alert”, and reads, “The server's host key is not cached in the registry…”, click:
Yes - login as: <Username>
- password: <Password>
OSX
- Open a terminal window
- Type:
ssh -l<Your NIMBioS User Name>
Ex:ssh -l johndoe3 home.nimbios.org - If you see, “
The authenticity of host '<hostname>' (<IP address>) can't be established.”, type:yes - Enter your password
Linux
- Open a terminal window
- Type:
ssh -l<Your NIMBioS User Name>
Ex:ssh -l johndoe3 home.nimbios.org - If you see, “
The authenticity of host '<hostname>' (<IP address>) can't be established.”, type:yes - Enter your password
Step 2: Starting the VNC Server
- In your SSH terminal window, at the command prompt, type:
uservnc
Theuservnccommand will generate a VNC session for you. Because VNC poses certain security risks a random password will be generated and given to you to use when connecting via your VNC client. Theuservnccommand will display the following information when the VNC server is ready for use:
Setting up your VNC service...

stored passwd in file /tmp/uservnc.1695.pass

Your VNC server is ready for use.  Connect your VNC client to:

  Host: canis.nimbios.org
  Port: 5900
  Password: f495hr0n

Have fun!
In the next step you will use the information provided to you by theuservnccommand to connect to the VNC service on the remote host with the VNC client on your local host.
NOTES: Because a VNC server poses certain risks, the following security features have been implemented:
- You will have 2 minutes to connect with your VNC client before the VNC service times out, and the
uservnccommand exits. - You must leave your SSH window open in order for the
uservnccommand to continue running. If your SSH window closes then the VNC server is also closed, and your VNC service will terminate.
Step 3: Connecting To The VNC Service With Your VNC Client
This last step in gaining access to your remote host's desktop is to start your VNC client and connect to the VNC server running on the remote host. All of the information you will need is provided by the uservnc script in Step 2 above. Namely:
- The name of the remote host to connect to. (Ex:
canis.nimbios.org) - The port on the remote host where the VNC server is listening for connections. (Ex:
5900) - The one-time random password that your VNC server is expecting. (Ex:
f495hr0n)
The easy thing to do is to use your mouse and copy-and-paste this information into the appropriate controls of your VNC client.
Windows
An example of TightVNC running on Windows XP:
- When starting TightVNC, you are presented with a window asking you the name of the remote host to which you want to connect.
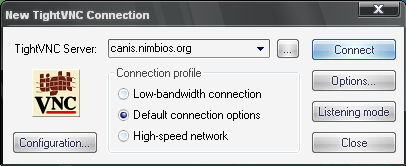
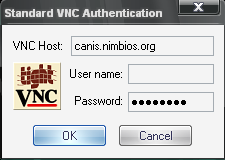
After entering this information, clickConnect. - Next you are prompted to enter the password provided by the
uservnccommand.
- Once the VNC client connects, you will be presented with the desktop of the remote host. Here, the user is presented with the remote host's login screen.
")
- An example of TinyVNC running on a Windows XP local host, displaying the remote console of a user logged into a remote host.
")


")
")
OSX and Linux
The process for connecting your VNC client under OSX and Linux is identical. If you have familiarized yourself with your VNC client's manual and controls then you should have no problem following the same basic steps.
Disclaimer
- NIMBioS IT staff will not take responsibility for your personal machine. The reader is expected to know how to administrate his or her own machine.
- The documentation above is merely for guidance. Menus, options, and commands presented may not match the reader's particular operating system, software, or versions.
- None of these documents have a brain. Readers are expected to provide their own.
