Table of Contents
NOTE: This documentation is out of date, but it's the thought that counts. Right?
NIMBioS' Ubuntu-11.04 Operating Environment Introduction
This document is a quick introduction and walk-through of the NIMBioS working environment, which is based on the Ubuntu-11.04 distribution of Linux. This guide will introduce you to some of the basics of using a NIMBioS workstation. (However, Linux is very, very powerful, and this introduction is only scratching the surface of what Linux can do.)
IMPORTANT NOTE
DO NOT SHUT DOWN, POWER OFF, REBOOT, OR UNPLUG (from neither network nor power) A LINUX WORKSTATION.
- The IT staff may be working behind the scenes to push out system updates and/or configuration changes. Interrupting the machine during this process will interrupt their work. This makes for unhappy IT staff.
- There may be other users logged in remotely, and who are working on important projects in the background. Interrupting the machine will interrupt their work. In some cases, days of computational research may have to be restarted. This makes for unhappy users.
- An integrated, enterprise-level computing environment works best when all the pieces fit together. Interrupting the machine will make the other machines miss their friend. This makes for unhappy machines.
Any interruption to the normal operating state of a Linux workstation is unacceptable. In the event that your workstation should become unresponsive or otherwise unusable, the proper response from the user is to seek assistance from the IT staff.
Desktop Terminology
There are a few things that should be defined before you continue:
- The Power Icon:

Depicted as a circle intersected at the top by a straight line. You have probably seen this symbol before on other devices, it is often used as a means of turning something on or off. In this case, the icon is depicted on the button that activates the menu used to log out of your session. (As a reference for new users, it's nearest cousin in another OS would have to be the Apple button is OSX.)
- The Ubuntu Icon:

Similar to the Windows “Start” icon, this icon activates a menu from which you can find programs and settings.
- The Dash:
This is the menu that is activated when you click on the Ubuntu icon (mentioned above) or press the super key (mentioned below). From the dash, you can search for applications and files.
- The Launcher:

The launcher is similar to Apple OSX's dash or Windows 7's task bar. The Launcher holds icons for often-used applications, icons for running applications, a portal to your files, and icons for removable media.
- The Super Key: Canonical (the makers of Ubuntu) refer to the “Super Key” often in their documentation. The super key is simply a key that will activate the dashboard. The idea of a super key is merely an abstraction. You see, since Ubuntu runs on a variety of hardware the key you use as your super key is dependent on what machine you are sitting at. That may sound confusing at first, but it's really quite simple:
- On a PC, the super key is the Windows key:
- On a Mac, the super key is the command key:
- And if you're lucky enough to have an enlightened Ubuntu keyboard, the super key is the Ubuntu key:


- The Middle-Click: Linux instructions may sometimes refer to clicking the middle mouse button. This is a hold-over from the “Good Ol' Days” of Unix computing, when the mice on Unix workstations had three buttons on them:

In this context, instructing the user to click the middle mouse button made perfect sense. But with today's popular Apple and PC mice with no obvious middle button, this can be a little confusing. Not to fear: Whenever someone instructs you to click the middle mouse button, you can take one of the following two actions:- Click the mouse wheel. Most modern mice have a scroll wheel that also serves as a middle button.
- Click both the left and right mouse buttons together. For mice without a clickable scroll wheel, this will have the same effect.

- Combination Keys: Many keyboard shortcuts involve pressing and holding one (or more) keys, and then pressing another key while still holding down the first key(s). An example of this would be alt-F1 (press and hold the alt key and then press the F1 key). Be sure to press the keys in the order shown, as some keyboard shortcuts are sensitive to the order in which key are pressed.
Logging In
When you first sit down in front of a NIMBioS Linux workstation you will be presented with a login screen that looks like this:

Type in your username, and either press RETURN or click “Login” to continue:

Next, you will be prompted to enter your password. As you type, you will see dots appear. You will not be able to see the characters you type:

Press RETURN or click “Login” to continue. If you want to abandon your login or start over, click “Cancel”.
Guest Login
All NIMBioS workstations support a guest login account. When a user logs in as a guest, a special guest user space is created dynamically. Then the user logs out, this guest user space is automatically removed.
To log in as a guest, simply enter “guest” for the username:

There will be a short pause as your guest user area is set up. When your guest login session begins, you will be presented with an important announcement:

Since guest accounts are created dynamically, and removed upon logout, it is up to the guest user to arrange offsite or offline storage of any files or other data created or downloaded.
NOTE: As a guest user, any changes made, any files created, or any data downloaded will disappear upon logout.
Advanced Login Options
For the user with discerning tastes or non-standard needs, there are a few things that you can customize about your desktop environment that require changes to your login session. After you have entered your username the bottom panel will change to display three pop-up menu options:

Beginning on the left, the first menu option allows you to select an alternative language to use:

To select a different language, click on this pop-up menu. If your language is listed, you may select it from the pop-up list. Otherwise, click “Other…” to receive a more comprehensive list of available languages:

The next pop-up menu allows you to select your keyboard:

To select a custom keyboard layout, click on this pop-up menu. If your desired layout is listed, you may select it from the pop-up list. Otherwise, click “Other…” to receive a more comprehensive list of available keyboard layouts:

The last pop-up menu allows you to select your login session manager:

If you're feeling adventurous then feel free to experiment. If you get stuck or don't like your alternate desktop session, you can always log out and log back in, selecting a different session manager the next time. But if all you want to do is get to work, then unless you know what you're doing you should leave this set to “Ubuntu” unless instructed otherwise by an IT staff.
Logging Out
Once logged in, you can log out by clicking on the power icon in the upper-left corner of the screen. (The power icon looks like a circle with a straight line breaking through the top of the circle. You have probably seen similar icons used on electronic devices and other operating systems.):

From the drop-down menu, select “Log Out…”
The other options: Suspend, Hibernate, Restart, and Shut Down, all require a valid administrator's password.
NOTE: It is recommended that users log out at the end of their workday. Some operating system changes, including security upgrades, may require that IT staff reboot the machine. In such an event, every care will be taken to ensure that user files, data, and computational research is not interrupted or lost. However, power outages may still occur without warning, so logging out is still the safest way to ensure the integrity of your files when you leave the premises.
A Quick Tour Of Your Desktop
When you log in to your account (or the guest account), you will be greeted with a desktop that looks something like this:

The Panel
At the top of the screen is the panel. The panel is a bar that stretches all the way across from the upper-left to the upper-right. Beginning in the upper-right corner, the first thing you see is a set of icons.

This cluster of icons behaves similar to the system tray on Windows. As you run programs or use services, new icons may appear or disappear from this tray. Clicking on an icon will activate a pop-up menu with options relevant to the functioning of that application or service.
- The first icon on the far right is a power symbol (a circle with a straight line cutting through the top). Clicking on this icon gives you a drop-down menu:
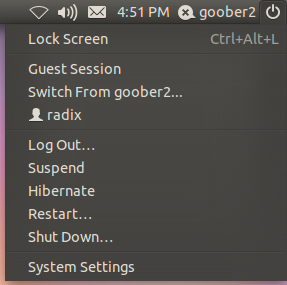
- “Lock Screen” – Selecting this option will activate the screen saver. Your password will be required to return to the desktop. This hides your session from prying eyes or malicious fingers.
- “Guest Session” – This option will hide your session and activate a new session as the guest user.
(NOTE: Apparently this option does not work as intended. Instead, this option will lock the screen.) - “Switch from <username>…” – This option will hide your session and activate a login screen, where another user can log in. When the other user logs out, you can log back in and find all of your programs and files still open and running.
- “Log Out…” – This option will end your session, closing your files and stopping any applications that you have running (unless you have arranged for them to continue running the background).
- “Suspend” – This option is disabled for regular users and requires an admin's password.
- “Hibernate” – This option is disabled for regular users and requires an admin's password.
- “Restart…” – This option is disabled for regular users and requires an admin's password.
- “Shut Down…” – This option is disabled for regular users and requires an admin's password.
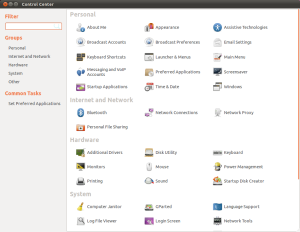
- “System Settings” – This option opens the Control Center, where you can change much of your desktop's look and feel:


- Proceeding left, the next icon you see in the system tray is the user indicator.
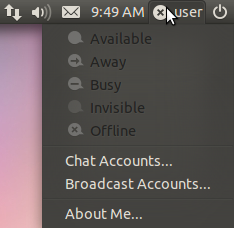
This indicator shows you the username of whoever's logged in on a particular machine. (Presumably this will be you most of the time.) Clicking on this icon brings up a menu of social settings that work with other Ubuntu social networking programs, such as Pidgin[1].

- The next icon you will see displays the system time.
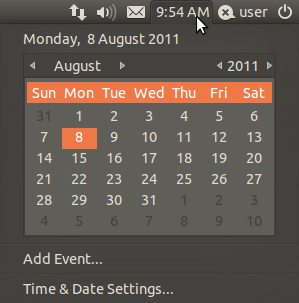
Clicking on this icon will display a pop-up calendar. From here you can not only view time and date, but you can also change the clock settings for this application. This application interfaces with another application named Evolution[1]. Evolution is an email and calendar program. It's Linux's answer to Microsoft Outlook. (Here at NIMBioS we have our own supported applications for calendaring and email services, so your use of Evolution is purely optional.)


- The next icon is the volume indicator.
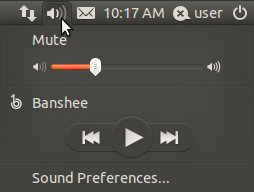
Clicking on this applications pops up a menu where you can set your volume level or mute the sound all together. There are also a set of quick-access control buttons for Banshee, the default Ubuntu music player[1], as well as quick-access to the Sound Preferences configuration application.
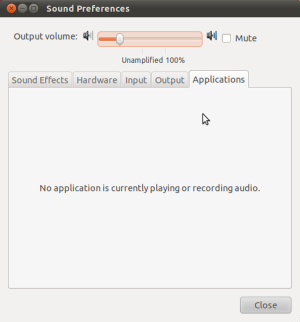
From this application, you can: (1) See what applications are currently using the sound service; (2) Select your sound input and output devices; (3) See what sound hardware is available on your system; and (4) Select an alternate sound theme for your desktop and set several desktop sound options.


- The last icon you see in the system tray (in a standard desktop setup) will be the network indicator icon.
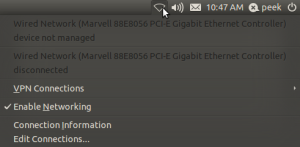
From here you can inspect your machine's network connection, but the device is managed by the administrator. This is why you will see “device not managed” and “disconnected” listed in the pop-up menu.

- In the upper far-left corner you will see the Ubuntu button.
Clicking this button will open the dash (see below) where you can search for applications and files.
Using The Panel
- Click on icons to activate their pop-up menus.
- Press F10 to open first pop-up menu for the first icon in the system tray.
- Use the left and right arrow keys to switch to other icons in the tray.
- Use the up and down arrow keys to navigate through an item's pop-up menu.
- Click on the Ubuntu icon to open the dash.
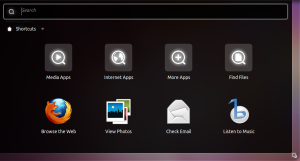
The Dash
One of the first things that you will notice about your desktop is the lack of an applications menu (similar to the Start menu for Windows, or the Applications folder for OSX). This is because the menu system for Ubuntu has been replaced with the dashboard, or just dash for short.

The dash is a search application that allows you to quickly find the application or file that you want by typing in the search bar. In addition to browsing through the listed files and applications in the results window below the search bar, you can also type the name of the application or file, or type a keyword associated with that application or file, and results displayed will fine-tune itself as you type.
For instance, want to burn a data DVD? If you know that the Linux CD/DVD burning program is named Brasero then you can type it by name. But what if you don't know that? Then you could also begin your search by typing the word “burn” into the dash search bar, and a list of associated applications will appear:

Note: For oft-used programs, you can drag the application's icon from the dash and drop it into the launcher on the left.

The application's icon will stick to the launcher and remain there for easy access. (You can always remove unwanted application icons from the launcher as well.)
Using The Dash
- Click on the Ubuntu button or press the super key to open the dash.
- Press alt-F2 to open the dash in command mode, where you can enter a command to run (as though you were typing it on the command line).

- Click on icons directly, or use the arrow keys to navigate to the icon you want, and then press enter on an application icon to activate it.

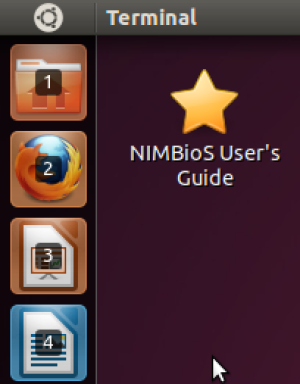
The Launcher
The launcher behaves almost exactly like OSX's dock or Window's task bar. The launcher displays a list of application icons and removable devices.

Using The Launcher
- To activate an application, or to bring a running application's window to the top, left click on the application's icon. From the keyboard, you can also press-and-hold the super key. A number or letter will appear over each application icon listed in the launcher. While still holding down the super key, press the associated number or letter over the application icon that you want to activate.
Note: If an application has multiple windows open, this will bring all of them to the top.

- To open a new window in a currently-running application, middle-click on the application's icon. From the keyboard, press and hold super-shift, and then press the associated number or letter that appears over the desired application icon.
- To open the trash, left click on the trash icon, or press super-T.
- All applications listed in the launcher have an associated pop-up menu. To activate an application icon's pop-up menu, right-click on the application's icon.

From this pop-up menu, you can tell the launcher to keep the icon, or to remove the icon (after the application closes, if it's currently open), and you can quit the icon. Certain applications may have additional pop-up menu items that you can select as well.

- To shift the keyboard focus to the launcher, press alt-F1. Use the arrow keys to navigate up and down the launcher, and the enter key to launch an application. The right arrow key will expose the icon's pop-up menu, and the up and down arrow keys to navigate through the pop-up menu's items.
- To open a terminal window, press cntrl-alt-T.
- To open the dash and display applications, press super-A.
- To open the dash and display files and folders, pres super-F.
- Click and hold the mouse on an application icon, and then drag just a little to the right. This will pop the icon out. Now you can drag the icon up and down the launcher to change it's position. The other icons will move up or down to make space for you as you drag. Drop the icon back into the launcher to re-seat it at it's new location.
Window Management
- To close a window, click on the title bar button with an 'X'.


- To minimize a window, click on the title bar button with a '-'.

- While a window is minimized, a small white tick mark will appear to the left of the application's icon in the launcher.

A new tick mark will appear for each new application window you open, up to three tick marks. The launcher will only display a maximum of three tick marks, even if you have more than three windows open for this application.


- To maximize a window:
Click on the title bar button with a box,

or drag the title bar up to the top edge of the screen, or double-click on the title bar.

- To minimize all windows, press super-D. Pressing again will restore them.
- To spread out all windows in all workspaces, press super-W.
- To cycle through all of the windows on your current workspace, press and hold alt and press the tab key.
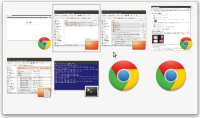
This will being up a translucent task selection window containing a scaled image of all the applications open on the current workspace.- Pressing tab will cycle through them from left-to-right.
- Pressing shift-tab will cycle through them from right-to-left.
- Pressing the arrow keys will allow you to navigate directly to the application of your choice.
- Releasing the alt key will bring up the selected application. If the application is minimized, then the application will be restored. If the application is partially obscured by the window of another application, it will be brought to the top.
- Pressing the escape key will cancel the selection process and the window will disappear.

- Holding down control-alt and pressing tab will bring up a task selection window showing you every running application on every workspace.
Workspace Management
There is a concept in the Linux community of having multiple virtual desktops, or workspaces. While OSX and Windows each have something similar, Linux has been doing this since 1994. Each workspace can have it's own set of application windows. Think of it as multiple screens that you can switch between. The desktop that you see when you first log in is merely one workspace. By default, there are three more.

You might have email and a web browser open in one workspace, a document open in another, and a spreadsheet open in yet another. And you can switch back and forth between them quickly and easily.
Using Workspaces
- To expose all workspaces, click on the Workspace Switcher application icon in the Launcher, or press super-S.
- To expose all windows in the current workpace, press shift-alt-up-arrow.
- To change to another workspace, click on the Workspace Switcher application icon, and then double-click on the workspace that you wish to switch to. Or you can press cntrl-alt and an arrow key to slide quickly to another workspace.
- While all workspaces are exposed, you can drag windows around from one workspace to another.
For Further Reading
For a comprehensive list of how Ubuntu's Unity desktop works, see the following links:
Footnotes
- Many of the default applications can be configured by the user. For instance, the default web browser is Firefox, the default email client Evolution, and the default chat client is Empathy. Don't like that? Want Chrome for your web browser, or Thunderbird for your email? That's great! Change your desktop settings and you're on your way! To change your desktop settings, click on the power icon in the upper-right corner of your desktop, and select “System Settings”, then click on “Preferred Applications”.
Disclaimer
- NIMBioS IT staff will not take responsibility for your personal machine. The reader is expected to know how to administrate his or her own machine.
- The documentation above is merely for guidance. Menus, options, and commands presented may not match the reader's particular operating system, software, or versions.
- None of these documents have a brain. Readers are expected to provide their own.
