Table of Contents
NIMBioS Email Setup Guide
As a user of NIMBioS computing resources you have an email account on the NIMBioS system. However, in order to use this account you must first set up your email reader of choice so that it knows how to send and retrieve email. You may use any IMAP-capable email reader that you like so long as it meets the minimum requirements:
- An IMAP-capable mail reader
- With support for TLS and SSL encryption
- If you want to read your UT email using the same program then you will also need a mail reader that can access Exchange Web Services
Technical Information
Here, then, is what you will need to know in order to set up your email client:
NIMBioS.org Mail Server Settings
| Server: NIMBioS | |
|---|---|
| IMAP Server: | mail.nimbios.org |
| IMAP Security Settings: | SSL |
| SMTP Server: | mail.nimbios.org |
| SMTP Security Settings: | TLS (or STARTTLS) |
| SMTP Port: | 587 |
| NIMBioS Username: | Your NIMBioS username, as assigned by NIMBioS IT staff |
| NIMBioS Email Address: | <Your NIMBioS username>@nimbios.org |
UTK Mail Server Settings
UTK email is handled through Microsoft's Exchange Web Services. UT only offers support for a handful of email readers: Outlook (Windows, Mac, iOS, and Android), Gmail (Android), and Evolution (Linux).
For Windows, Mac, iOS, and Android, instructions for setup can be found here:
https://oit.utk.edu/email/setup/
For Evolution on Linux, setup instructions can be found here:
https://help.utk.edu/kb/index.php?func=show&e=2847
In theory any email client that supports Microsoft's Exchange Web Services will work.
Disclaimer
DISCLAIMER: You are expected to read and understand all the documentation regarding the installation, configuration, and use of your own software on your own computer. NIMBioS IT staff are not responsible for your computer.
Gnome Evolution Setup Guide
For Your NIMBioS.Org Account
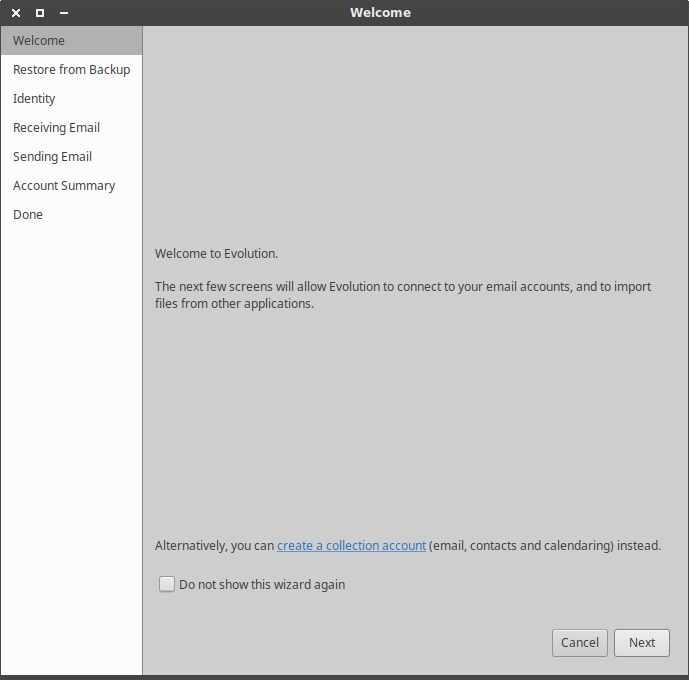
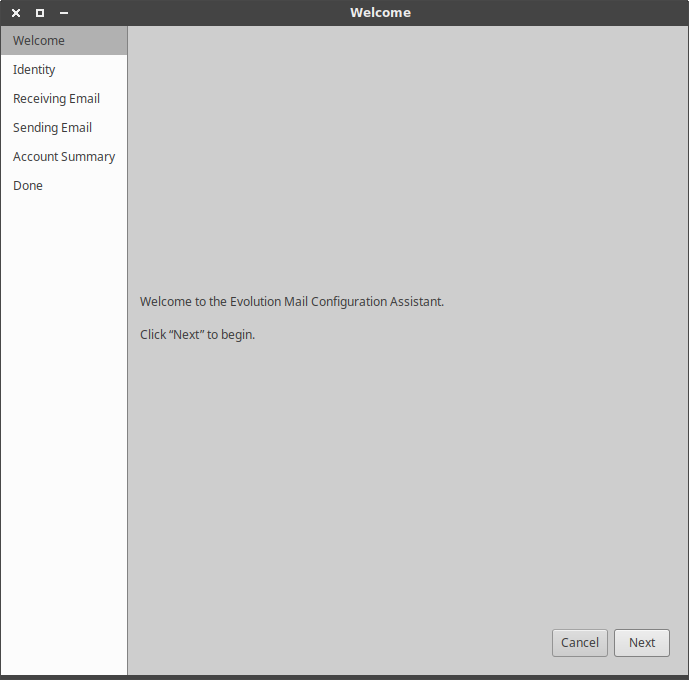
- When you first run Evolution an email account setup window will appear, titled “Welcome”.
If this is not your first time running Evolution, then click File > New > Mail Account, and the setup window will then appear.
Click: Next
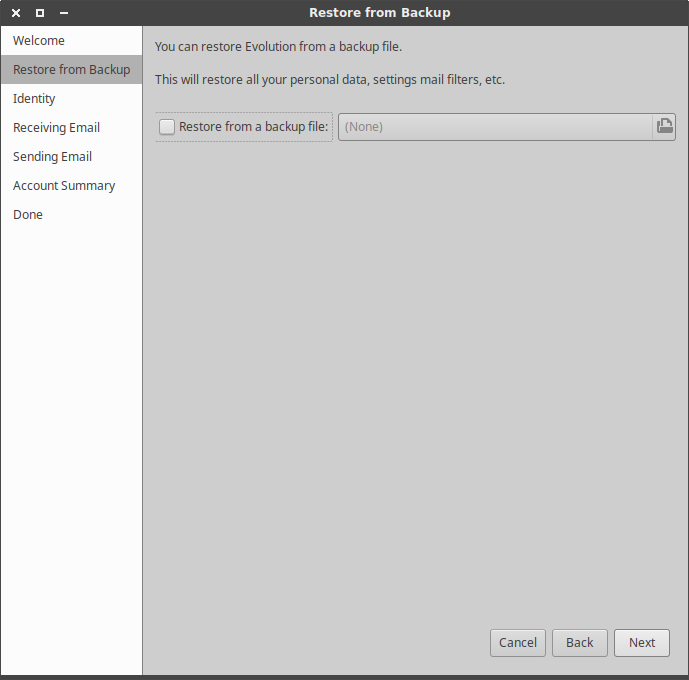
- Window: Restore from Backup
If this is the first time Evolution has been run then the next window you see will prompt you to optionally restore Evolution's settings from a backup file.
Click: Next
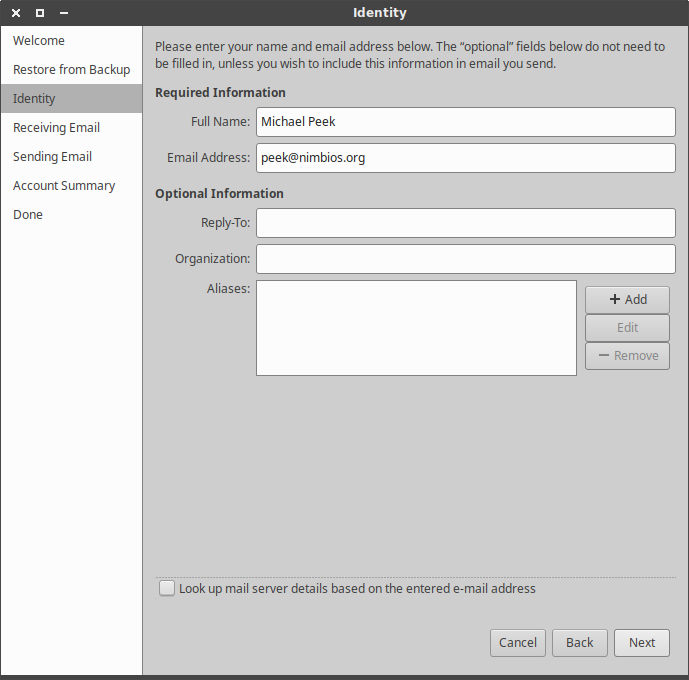
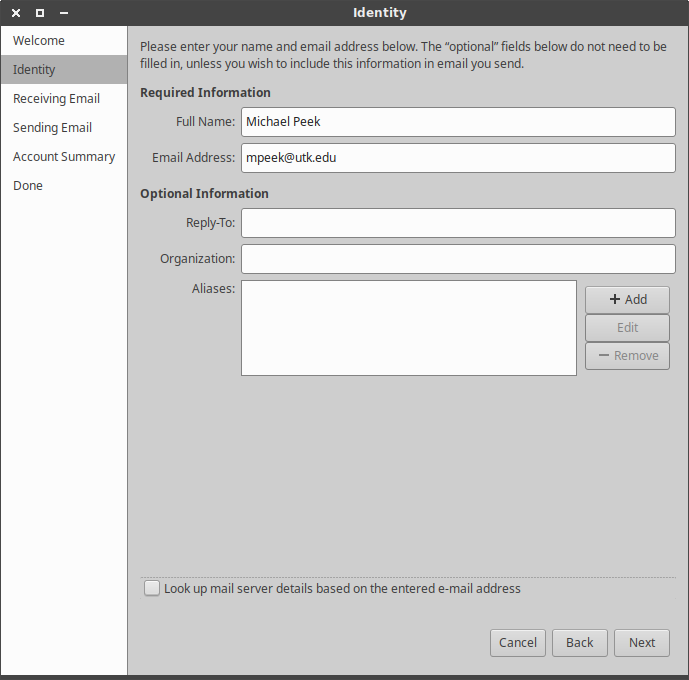
- Window: Identity
Full Name: <Enter your first and last name as you want it to appear for “Full Name”> (Ex: Michael Peek)
Address: <Enter your NIMBioS login username, followed by “@nimbios.org”> (Ex: peek@nimbios.org)
Uncheck “Look up mail server details based on the entered e-mail address”.
Click: Next
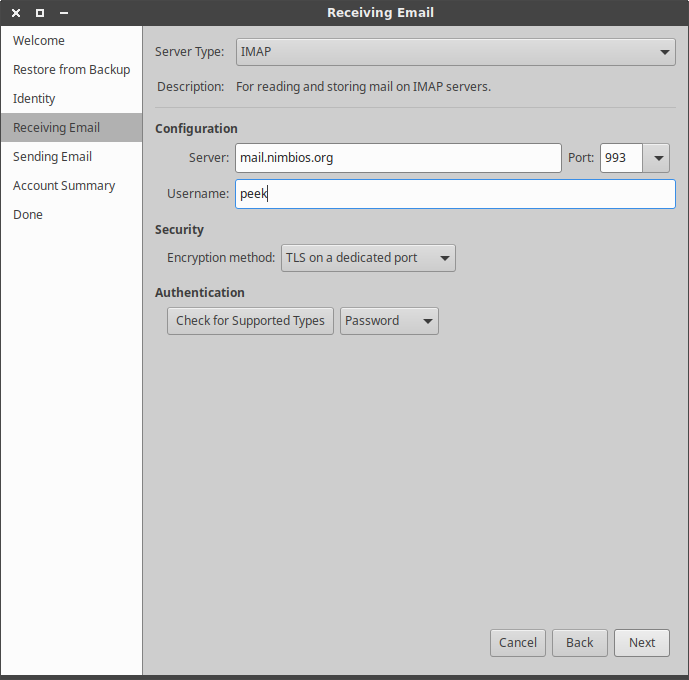
- Window: Receiving Email
Server Type: IMAP
Server: mail.nimbios.org
Port: 993
Username: <Your NIMBioS login username>
Encryption Method: TLS on a dedicated port
Authentication: Password
Click: Next
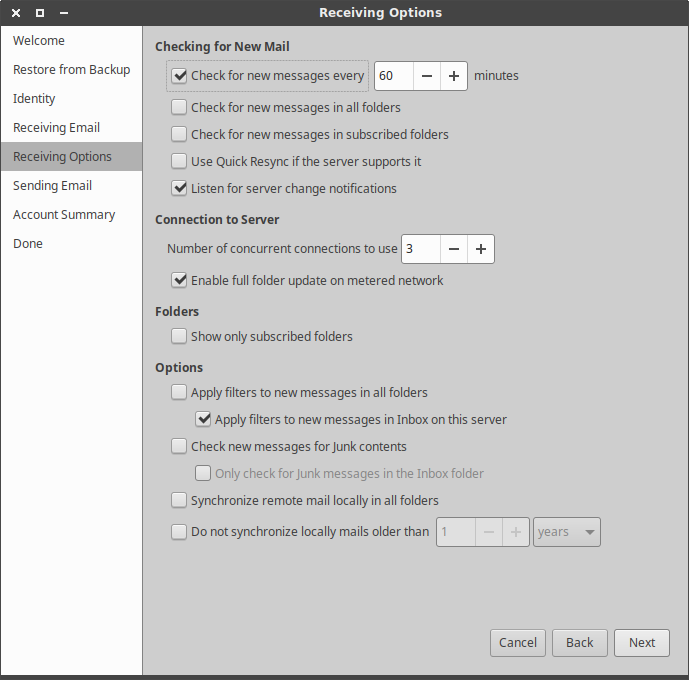
- Window: Receiving Options
Click: Next
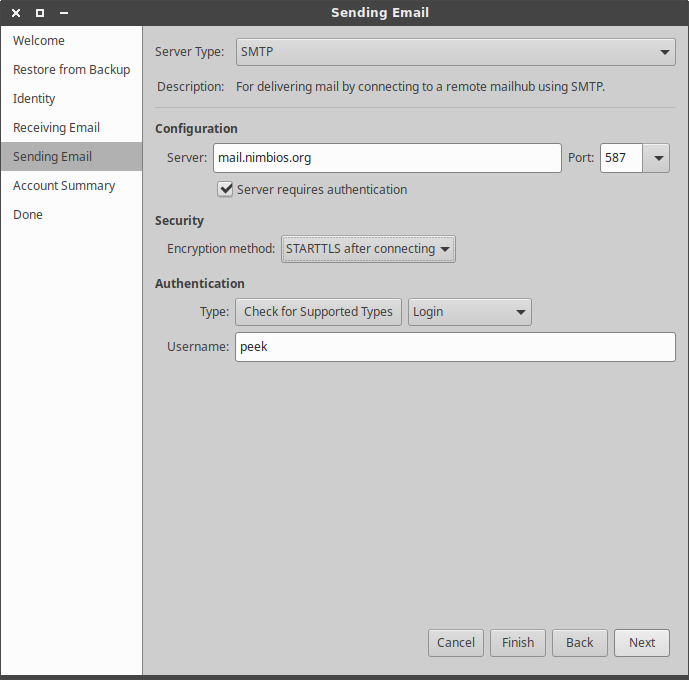
- Window: Sending Email
Server Type: SMTP
Server: mail.nimbios.org
Port: 587
Check: Server requires authentication
Encryption Method: STARTTLS after connecting
Type: Login
Username: <Your NIMBioS login username>
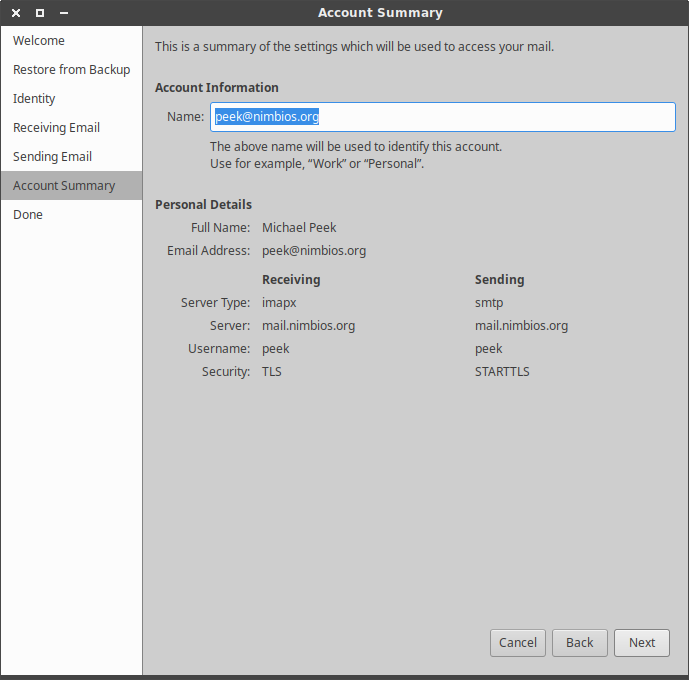
- Window: Account Summary
Next you are asked to enter a name for this account. This is how the account will appear in the accounts list on the left of the Evolution window.
Click: Next
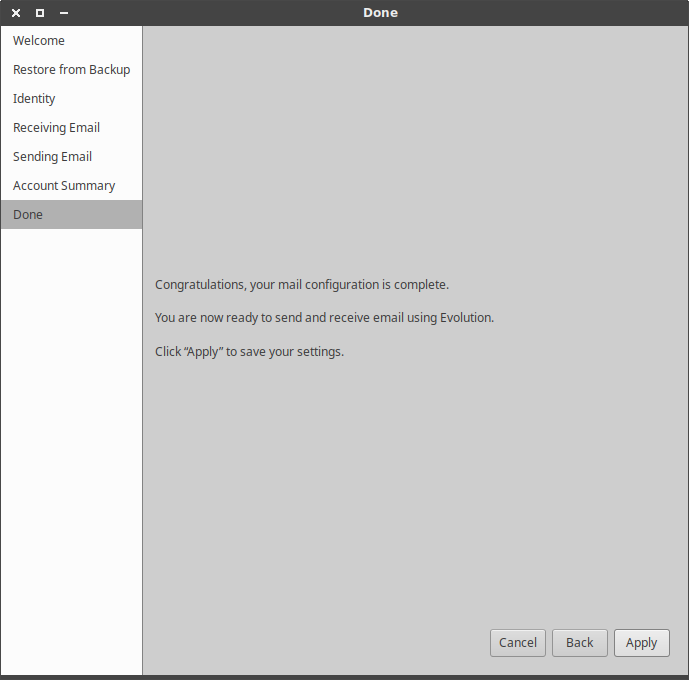
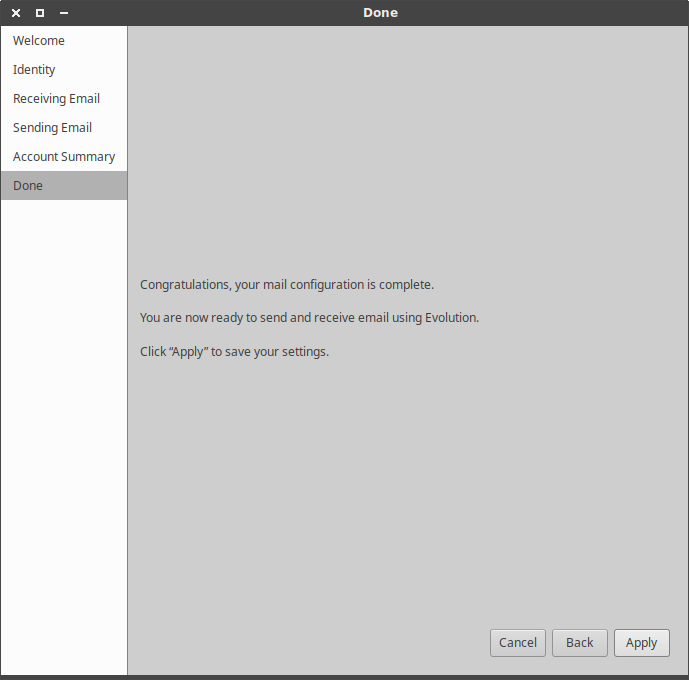
- Window: Done
Click: Apply
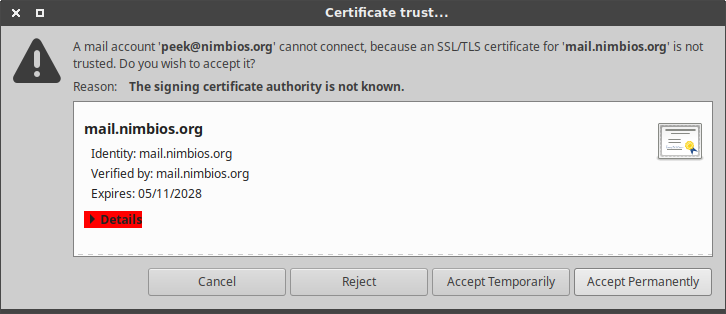
- Window: Certificate trust…
You may be presented with a window asking you if you want to trust the certificate from the NIMBioS mail server.
Click: Trust Permanently.
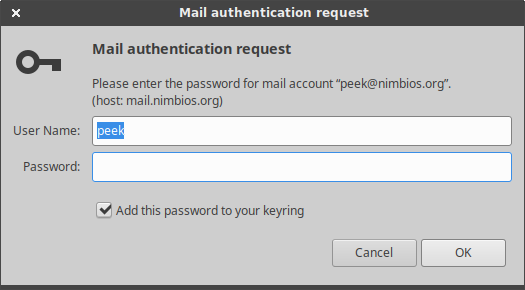
- Window: Mail authentication request
Finally, you will be asked to enter your password. If you check “Add this password to your keyring” then you will not be asked to re-enter your password again unless your password changes.
For Your UTK Account
- When you first run Evolution an email account setup window will appear, titled “Welcome”.
If this is not your first time running Evolution, then click File > New > Mail Account, and the setup window will then appear.
Click: Next
- Window: Identity
Full Name: <Enter your first and last name as you want it to appear for “Full Name”> (Ex: Michael Peek)
Address: <Enter your UT NetID, followed by “@utk.edu”> (Ex: mpeek@utk.edu)
Uncheck “Look up mail server details based on the entered e-mail address”.
Click: Next
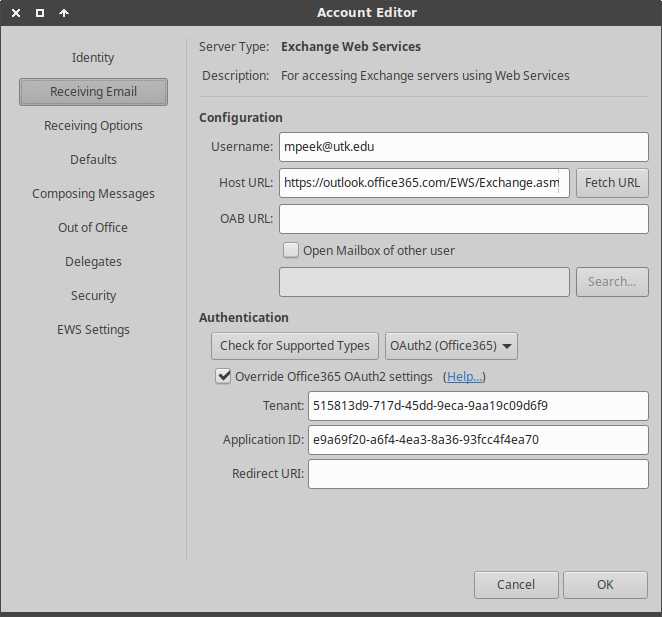
- Window: Receiving Email
Server Type: Exchange Web Services
Username: <Your UT NetID>@utk.edu> (Ex: mpeek@utk.edu)
Host URL: https://outlook.office365.com/EWS/Exchange.asmx
Authentication: OAuth2 (Office365)
Check: Override Office365 OAuth2 settings
Tenant: 515813d9-717d-45dd-9eca-9aa19c09d6f9
Application ID: e9a69f20-a6f4-4ea3-8a36-93fcc4f4ea70
Click: Next
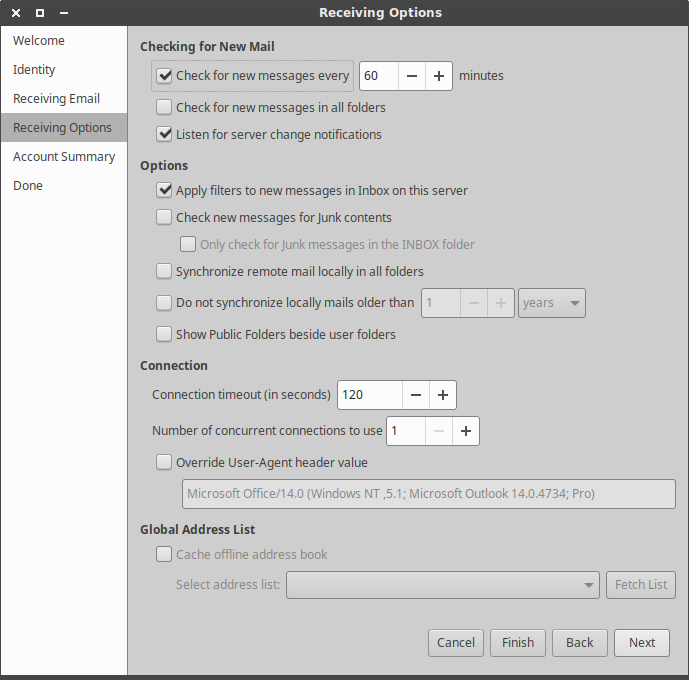
- Window: Receiving Options
Click: Next
- Window: Account Summary
Click: Next
- Window: Done
Click: Apply

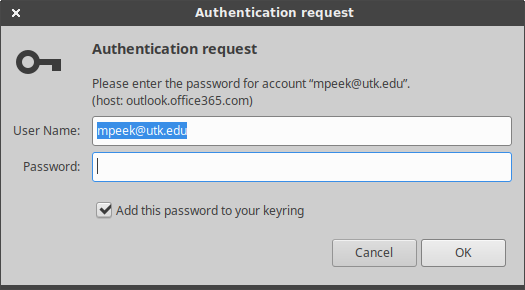
- Window: Authentication request
Finally, you will be asked to enter your password. If you check “Add this password to your keyring” then you will not be asked to re-enter your password again unless your password changes.
For Your Google Account (Including nimbiosonline.org)
- When you first run Evolution an email account setup window will appear, titled “Welcome”.
If this is not your first time running Evolution, then click File > New > Mail Account, and the setup window will then appear.
Click: Next

- Window: Identity
Full Name: <Enter your first and last name as you want it to appear> (Ex: Michael Peek)
Address: <Enter your Gmail or nimbiosonline.org email address> (Ex: peek@nimbiosonline.org
Uncheck: “Look up mail server details based on the entered e-mail address”.
Click: Next

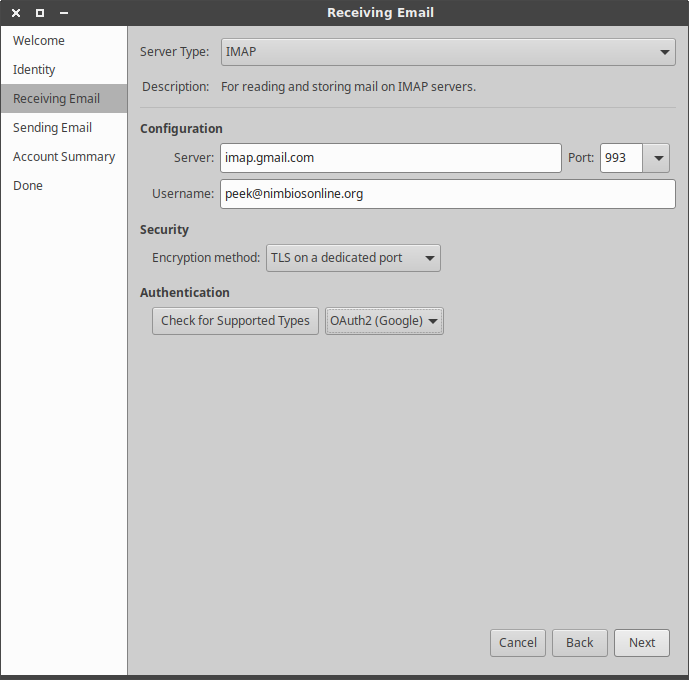
- Window: Receiving Email
Server Type: IMAP
Server: imap.gmail.com
Port: 993
Username: <Your Gmail or nimbiosonline.org email address> (Ex: peek@nimbiosonline.org)
Encryption method: TLS on a dedicated port
Authentication: OAuth2(Google)
Click: Next
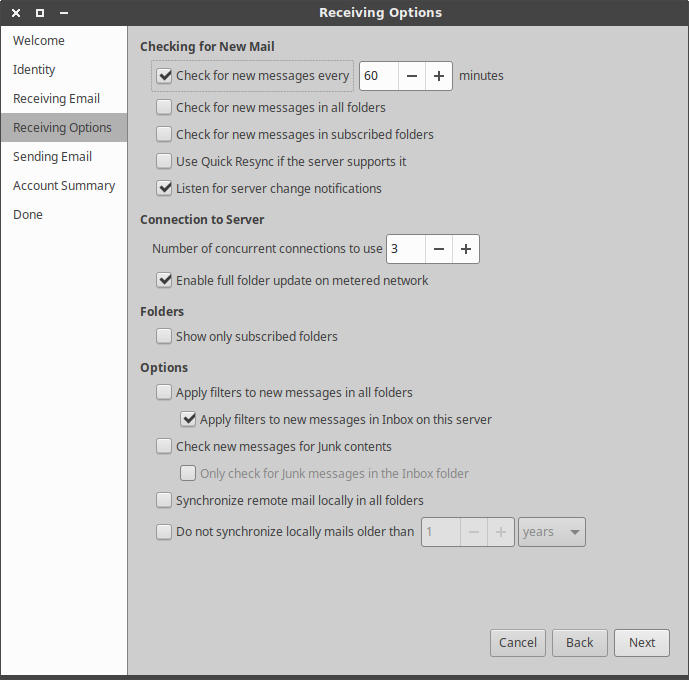
- Window: Receiving Options
Click: Next
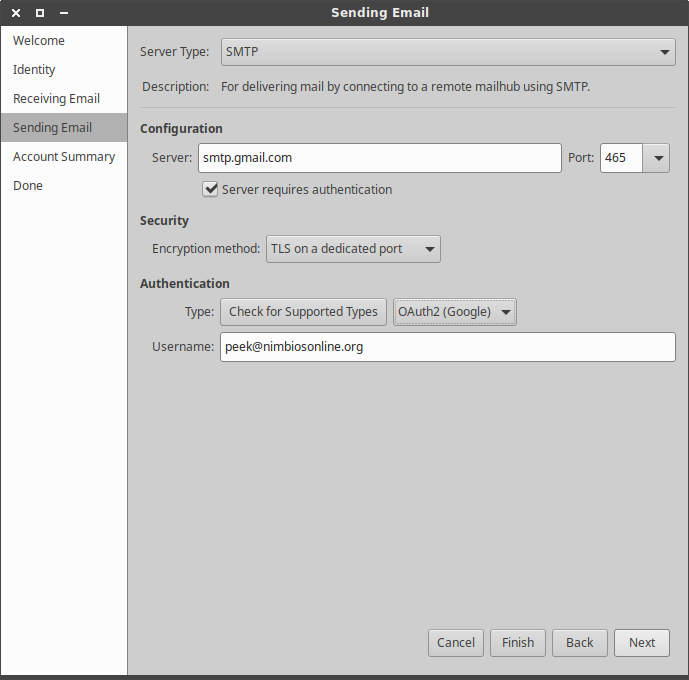
- Window: Sending Email
Server Type: SMTP
Server: smtp.google.com
Port: 465
Encryption method: TLS on a dedicated port
Authentication: OAuth2(Google)
Username: <Enter your Gmail or nimbiosonline.org email address> (Ex: peek@nimbiosonline.org)
Click: Next
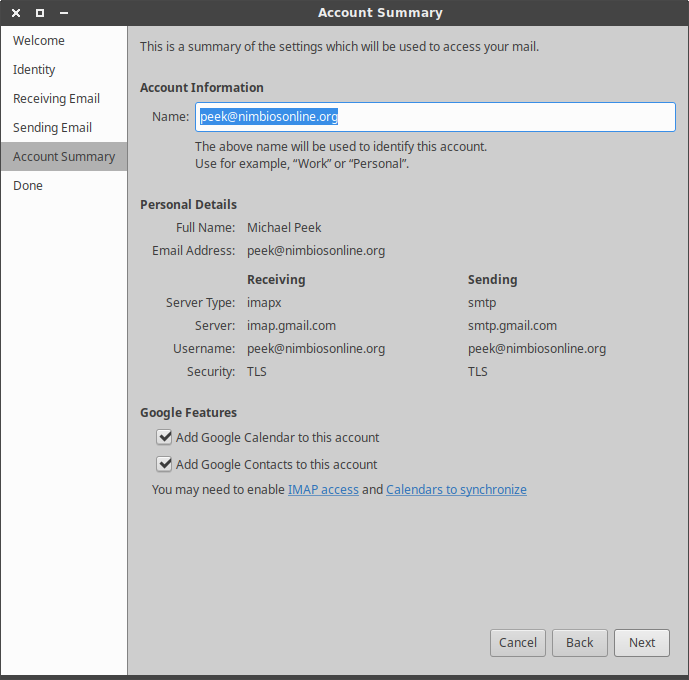
- Window: Account Summary
Click: Next
- Window: Done
Click: Apply
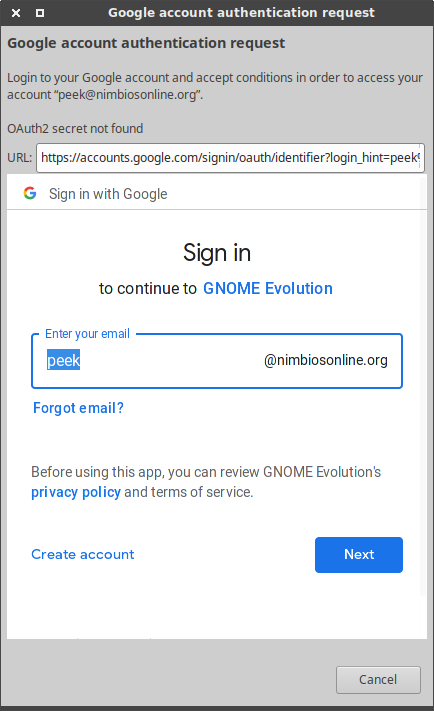
- Window: Google account authentication request
Click: Next
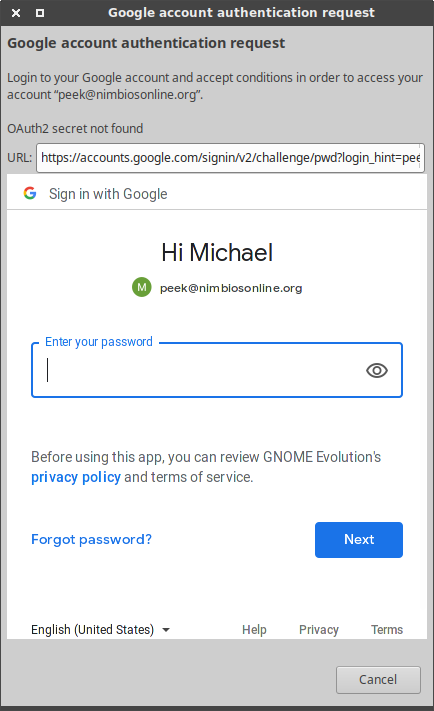
- Window: Google account authentication request (cont'd #1)
Enter your password for your Gmail or nimbiosonline.org account
Click: Next
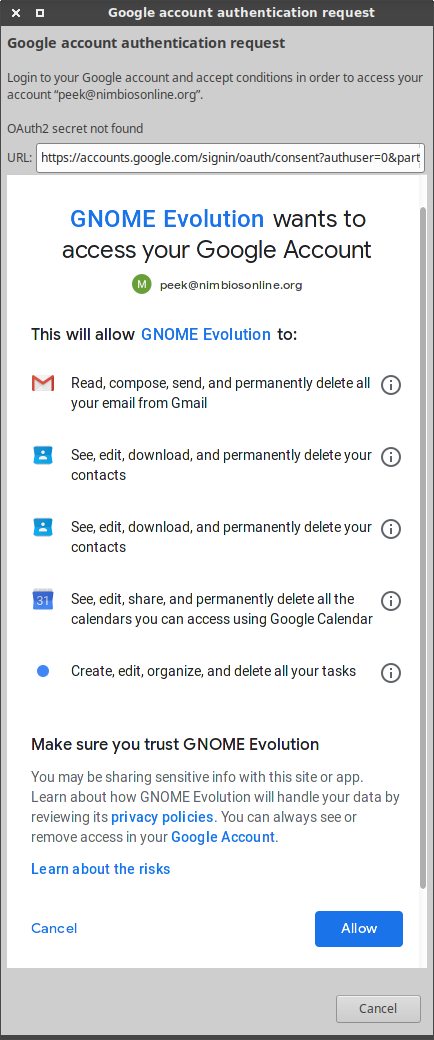
- Window: Google account authentication request (cont'd #2)
Click: Allow
Spam
The number one way for spammers to find your email address is by posting your email address on the web. Spammers have robots, programs that crawl the web, searching for anything that looks even remotely like an email address. So if you're smart, you won't ever allow your email address to be posted on the web.
The NIMBioS email server has a spam filter that all incoming email passes through. Messages that the server believes are spam are marked with the string “[SPAM]” pre-pended to the subject line of the message. Additionally, when an incoming message is determined to be spam, the NIMBioS mail server will hang up on the remote host delivering the message and report that a permanent delivery failure has occurred. (Hanging up on the spammer is the only thing that they understand, and the best way to minimize the damage once a spammer has harvested or guessed your email address.)
If you receive a spam message that is not marked “[SPAM]” then you can report it by forwarding the message to the “spam” user. The mail server will receive your message and learn from it's mistakes, so that next time it will have a better chance of catching similar messages. Very important: You must forward your message as an (message/rfc822) attachment. Forwarding as an attachment will preserve the original message's headers, which is critical – this is where all the details are that the mail server needs to see. Failure to forward spam as an attachment will result in the mail server being unable to process your message.
When you forward your message to the spam user, you will receive a receipt back that looks similar to this:
Message Number: 20100726.093003.000000
Number of message/rfc822 attachments found: 2
          Number of attachments registered: 2


The following attachments have been registered as SPAM:


[1]:       From: "J. McDonald" <top10.seo.training@gmail.com>
[1]:         To: peek@nimbios.org
[1]:    Subject: Free Webinar: Google / SEO - Top Ten Free Tools
[1]:       Date: Wed, 25 Aug 2010 18:32:22 +0400
[1]: Message-ID: <201008251432.o7PEWM3V017996@mylinux>
[1]:
[1]: SpamAssassin: [20529] warn: reporter: pyzor report failed: reporter: exited with non-zero exit code 1
[1]: SpamAssassin: 1 message(s) examined.
[1]: Exit code: 0
[1]: Exit signal: 0
[1]: SpamAssassin succeeded in registering this attachment

[2]:       From: <michaelpeek@users.sourceforge.net>
[2]:         To: michaelpeek@users.sourceforge.net
[2]:    Subject: [SPAM] Stun your lady into submission
[2]:       Date: Thu, 26 Aug 2010 11:14:44 +0200
[2]: Message-ID: <E1OoYUM-0005Vs-NY@catus.nimbios.org>
[2]:
[2]: SpamAssassin: [20553] warn: reporter: pyzor report failed: reporter: exited with non-zero exit code 1
[2]: SpamAssassin: 1 message(s) examined.
[2]: Exit code: 0
[2]: Exit signal: 0
[2]: SpamAssassin succeeded in registering this attachment


If you have any questions regarding this message, forward this message, along
with your comments, to help@nimbios.org.
This receipt is showing that I forwarded two spam messages. (Yes, you can attach as many spam messages as you like, and they will each be processed.) If you receive a receipt that says Number of attachments registered: 0, then something was wrong with your report and it could not be processed. Double-check your email client settings to be sure that it is configured to forward messages as an attachment.
Likewise, if you receive a message marked as “[SPAM]” that is not, you can forward your message to the “nonspam” user, and the mail server will learn from it's mistakes.
Auto-reply Messages
It's possible to set up an automated response in the event that you plan to be away from your email for an extended period of time.
Activating Your Autoreply Message
- Create (or edit) the file '~/autoreply.msg'. This should be a simple text file containing your response. It should look something like this:
I am away from my email and will return on ___.
In the interim, if you need assistance, please contact ___.
Sincerely, ___.
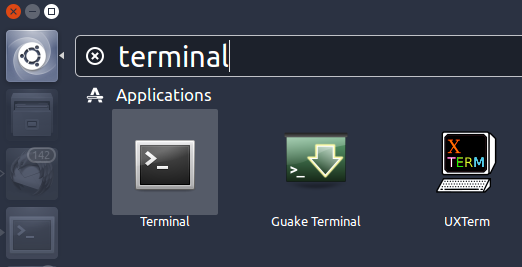
- Open a terminal window:
- Click on the Ubuntu icon in the upper left-hand side of the screen – at the top of the launcher
- The dash will appear; in the dash's search box type: terminal
- Click on the terminal icon
- In the terminal window, type: autoreply-on
For example:peek@catus:~$ autoreply-on Auto-reply on peek@catus:~$
NOTE: If you attempt to use 'autoreply-on' without first creating an 'autoreply.msg' file, the script will refuse to comply and instead inform you of the oversight:
peek@catus:~$ autoreply-on
*** ERROR: /home/peek/autoreply.msg : File not found

    This file must exist.  It should contain your auto-reply message.
    It should look something like this:

      I'm away from my office and return on ___.  In the interim,
      if you need assistance, please contact ___.
      Sincerely,
      ___

    Please create this file first and then try again.
If you have any questions about editors, might I suggest 'gedit' (GUI) or 'nano' (terminal) as easy editors to use.

Deactivating Your Autoreply Message
- Open a terminal window:
- Click on the Ubuntu icon in the upper left-hand side of the screen – at the top of the launcher
- The dash will appear; in the dash's search box type: terminal
- Click on the terminal icon
- In the terminal window, type: autoreply-off
For example:peek@catus:~$ autoreply-off Auto-reply off peek@catus:~$
Disclaimer
- NIMBioS IT staff will not take responsibility for your personal machine. The reader is expected to know how to administrate his or her own machine.
- The documentation above is merely for guidance. Menus, options, and commands presented may not match the reader's particular operating system, software, or versions.
- None of these documents have a brain. Readers are expected to provide their own.
