This is an old revision of the document!
Table of Contents
Where To Get Models
There are a plethora of available models online. One place to go to find them is to use the 3D model search engine known as Yeggi:
By entering a few search terms, Yeggi will display all of the models that it knows about, and link you to where they can be found.
- Pro: You don't have to know anything about modeling. You just download and print.
- Con: Not all models work. Not all models were designed for FDM materials. And not all models were designed to work on our printers. Modelers tend to design for themselves and then share the model as-is. Good (or really nice) modelers take into account the types of printers and materials on the market that users will likely have access to and tailor their models accordingly. But this is not always the case, so caveat emptor.
Software To Design Your Own Models
There are multiple software options available. I tend to stick with free and/or open-source, and that's whats listed here.
- https://www.tinkercad.com/ – This is the quickest and easiest way to get started. It runs completely within your browser, which means that there is no need to download or install any software. After creating an account you are presented with about 30 minutes of tutorials, and then you're ready to go. Because it's so easy to use this is what we use with the STEM Camp girls during the summer.
- OpenSCAD – Another one of my personal favorites. OpenSCAD is not an interactive modeler like the other CAD programs. Instead it's more like a compiler. The user writes text into a file using a language that OpenSCAD understands. OpenSCAD then interprets the text into the finished model. The user can open OpenSCAD and a text editor side-by-side. The user can then make changes to the text file, save, and watch OpenSCAD update it's visual accordingly. The main strength of OpenSCAD is the fact that it uses a language. This allows the user the ability to break their model down into smaller chunks. Shapes can be made up of basic primitives and may be modified using boolean operations and mathematical functions. The addition of loops and conditionals allows even greater things to be produced with just a few lines of code.
- Blender – Blender is a free and open-source 3D creation suite. In addition to modeling, blender can also be used for animation. Because of this, blender can seem especially intimidating at first. But it can also be a useful tool, as it allows you to repair broken models in ways that other CAD programs do not.
There are more out there popping up every day…
The Printing Software
There's lots of different software that you can use to communicate with printers, but the particular software used here is called MatterControl. We're using an older version of this particular software because it's one of only two software solutions that will communicate with the Makerbot Replicator 2, and the only software that will communicate with both the Makerbot and the Prusa i2mk3s.
To start the software, click on the icon: 
Connecting To The Printer
Printers: The Makerbot 2
- If the LCD screen on the printer is not lit up, then turn it on by reaching around the right-hand side of the machine to the back, and flip the switch located at the bottom, next to where the power and USB cables connect to the machine.
- In the MatterControl window, in the upper-left of the window, is a button labeled “CONNECT”, and next to it a drop-down list:
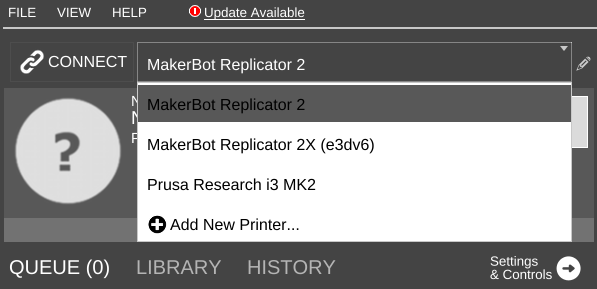
- Click the drop-down list and select: MakerBot Replicator 2
- Click: CONNECT
If the connection is successful then the CONNECT button will change to “DISCONNECT”

Printers: The Prusa i3mk2s
- If the LCD screen on the printer is not lit up, then turn it on by reaching around the right side of the machine and flip the power switch located at the bottom, underneath the power supply.
- In the MatterControl window, in the upper-left of the window, is a button labeled “CONNECT”, and next to it is a drop-down list:
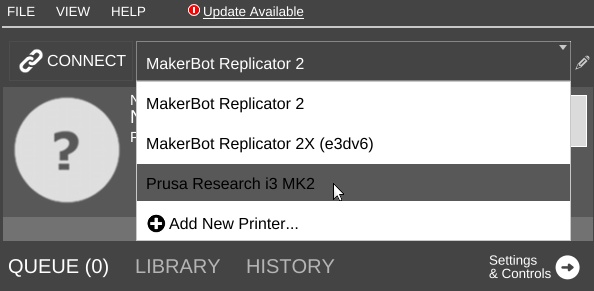
- Click the drop-down list and select: Prusa Research i3 MK2
- Click: CONNECT
If the connection is successful then the CONNECT button will change to “DISCONNECT”

